Quickstart
Note
This tutorial will show you the different parts needed to build a bot. You can run the code directly in the documentation, without installing anything! If you would like to run this locally, go to the Installation first.
In this tutorial you will create your first Rasa Core bot. You can run all of the code snippets in here directly, or you can install Rasa Core and run the examples on your own machine.
Goal
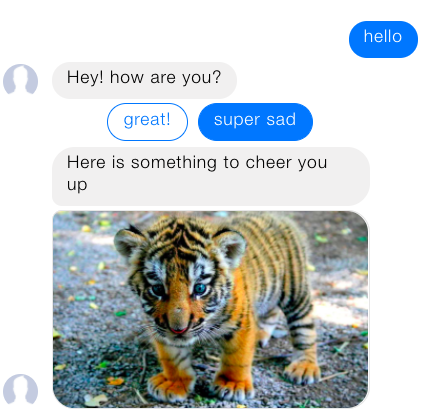
The bot will ask you how you’re doing, and send a picture to try and cheer you up if you are sad.
1. Write Stories
A good place to start is by writing a few stories. Rasa Core works by learning from example conversations, and we’ll write the first few examples ourselves to kick things off.
In this very simple conversation, the user says hello to our bot, and the bot says hello back. This is how it looks as a story:
## story1
* greet
   - utter_greet
A story starts with ## followed by a name (the name is optional).
lines that start with * are messages sent by the user.
Although you don’t write the actual message, but rather
the intent (and the entities) that represent what the user means.
If you don’t know about intents and entities, don’t worry!
We will talk about them more later.
Lines that start with - are actions taken by your bot.
In this case all of our actions are just messages sent back to the user,
like utter_greet, but in general an action can do anything,
including calling an API and interacting with the outside world.
We’ve written some example stories below, which we can write to a
file called stories.md If you are running this in the docs, it
may take a few seconds to start up. If you are running locally,
copy the text between the triple quotes (""")
and save it in a file called stories.md.
stories_md = """
## happy path
* greet
  - utter_greet
* mood_great
  - utter_happy

## sad path 1
* greet
  - utter_greet
* mood_unhappy
  - utter_cheer_up
  - utter_did_that_help
* mood_affirm
  - utter_happy

## sad path 2
* greet
  - utter_greet
* mood_unhappy
  - utter_cheer_up
  - utter_did_that_help
* mood_deny
  - utter_goodbye

## say goodbye
* goodbye
  - utter_goodbye
"""
%store stories_md > stories.md

print("Done!")
2. Define a Domain
The next thing we need to do is define a Domain.
The domain defines the universe your bot lives in.
Here is an example domain for our bot which we’ll write to a
file called domain.yml:
domain_yml = """
intents:
  - greet
  - goodbye
  - mood_affirm
  - mood_deny
  - mood_great
  - mood_unhappy

actions:
- utter_greet
- utter_cheer_up
- utter_did_that_help
- utter_happy
- utter_goodbye

templates:
  utter_greet:
  - text: "Hey! How are you?"

  utter_cheer_up:
  - text: "Here is something to cheer you up:"
    image: "https://i.imgur.com/nGF1K8f.jpg"

  utter_did_that_help:
  - text: "Did that help you?"

  utter_happy:
  - text: "Great carry on!"

  utter_goodbye:
  - text: "Bye"
"""
%store domain_yml > domain.yml

print("Done!")
So what do the different parts mean?
intents |
things you expect users to say. See Rasa NLU |
actions |
things your bot can do and say |
templates |
template strings for the things your bot can say |
entities |
pieces of info you want to extract from messages. See Rasa NLU |
slots |
information to keep track of during a conversation (e.g. a users age) - see Using Slots |
How does this fit together?
Rasa Core’s job is to choose the right action to execute at each step
of the conversation. Simple actions are just sending a message to a user.
These simple actions are the actions in the domain, which start
with utter_. They will just respond with a message based on a template
from the templates section. See Actions for how to build
more interesting actions.
In our simple example we don’t need slots and entities,
so these aren’t in the example domain.
Note
There is one additional special action, ActionListen,
which means to stop taking further actions until the user
says something else. You don’t have to include it in
your domain.yml - it is an action included by default.
3. Train a Dialogue Model
The next step is to train a neural network on our example stories.
To do this, run the command below. If you are running this on your machine,
leave out the ! at the start. This will train the dialogue model and store it
into models/dialogue.
!python -m rasa_core.train -d domain.yml -s stories.md -o models/dialogue

print("Finished training!")
4. Talking To Your Bot
Now we can use that trained dialogue model to run our bot. We haven’t included an NLU model yet, though, so we have to send structured data to our bot directly.
You can play around with the bot, directly sending in the intents in the domain.
To do this, start your message with a /.
Give it a try by sending the message /greet.
If you are running these commands locally, run:
python -m rasa_core.run -d models/dialogue
If you are running the cells here in the docs, run this cell:
This will not work if you haven’t run the cells above!
import IPython
from IPython.display import clear_output, HTML, display
from rasa_core.agent import Agent
import time

messages = ["Hi! you can chat in this window. Type 'stop' to end the conversation."]
agent = Agent.load('models/dialogue')

def chatlogs_html(messages):
    messages_html = "".join(["<p>{}</p>".format(m) for m in messages])
    chatbot_html = """<div class="chat-window" {}</div>""".format(messages_html)
    return chatbot_html


while True:
    clear_output()
    display(HTML(chatlogs_html(messages)))
    time.sleep(0.3)
    a = input()
    messages.append(a)
    if a == 'stop':
        break
    responses = agent.handle_message(a)
    for r in responses:
        messages.append(r.get("text"))
5. Add NLU
Of course you want your bot to understand real language, not just structured input.
An interpreter is responsible for parsing messages. It performs the Natural Language Understanding (NLU) and transforms the message into structured output. In this example we are going to use Rasa NLU for this purpose.
In Rasa NLU, we need to define the user messages our bot should be able to
handle in the Rasa NLU training data format.
In this tutorial we are going to use Markdown Format for NLU training data.
Let’s create some intent examples in a file called nlu.md:
nlu_md = """
## intent:greet
- hey
- hello
- hi
- good morning
- good evening
- hey there

## intent:goodbye
- bye
- goodbye
- see you around
- see you later

## intent:mood_affirm
- yes
- indeed
- of course
- that sounds good
- correct

## intent:mood_deny
- no
- never
- I don't think so
- don't like that
- no way
- not really

## intent:mood_great
- perfect
- very good
- great
- amazing
- wonderful
- I am feeling very good
- I am great
- I'm good

## intent:mood_unhappy
- sad
- very sad
- unhappy
- bad
- very bad
- awful
- terrible
- not very good
- extremely sad
- so sad
"""
%store nlu_md > nlu.md

print("Done!")
Furthermore, we need a configuration file, nlu_config.yml, for the
NLU model:
nlu_config = """
language: en
pipeline: tensorflow_embedding
"""
%store nlu_config > nlu_config.yml

print("Done!")
We can now train an NLU model using our examples (make sure to install Rasa NLU first).
Let’s run
!python -m rasa_nlu.train -c nlu_config.yml --data nlu.md -o models --fixed_model_name nlu --project current --verbose
to train our NLU model. A new directory models/current/nlu should have been
created containing the NLU model. Note that current stands for project name,
since this is specified in the train command.
Note
To learn more about Rasa NLU head over to the Rasa NLU documentation.
6. Talking To Your Bot
Now that we’ve added an NLU model, you can talk to your bot using natural language, rather than typing in structured input. Let’s start up your full bot, including both Rasa Core and Rasa NLU models!
If you are running these commands locally, run:
python -m rasa_core.run -d models/dialogue -u models/current/nlu
If you are running the cells here in the docs, run this cell:
This will not work if you haven’t run the cells above!
import IPython
from IPython.display import clear_output, HTML, display
from rasa_core.agent import Agent
from rasa_core.interpreter import RasaNLUInterpreter
import time

interpreter = RasaNLUInterpreter('models/current/nlu')
messages = ["Hi! you can chat in this window. Type 'stop' to end the conversation."]
agent = Agent.load('models/dialogue', interpreter=interpreter)

def chatlogs_html(messages):
    messages_html = "".join(["<p>{}</p>".format(m) for m in messages])
    chatbot_html = """<div class="chat-window" {}</div>""".format(messages_html)
    return chatbot_html


while True:
    clear_output()
    display(HTML(chatlogs_html(messages)))
    time.sleep(0.3)
    a = input()
    messages.append(a)
    if a == 'stop':
        break
    responses = agent.handle_message(a)
    for r in responses:
        messages.append(r.get("text"))
Congratulations 🚀! You just built a bot from scratch, powered entirely by machine learning. Why not play around with the code above?
- Teach your bot to understand you better. Add more NLU data, retrain the NLU model and restart your bot.
- Add some more stories to provide more examples of how your bot should behave. Then retrain the Rasa Core model to try it!
- Edit the response templates in the domain, retrain your model and see the results!
There is a lot more you can do with Rasa Core, so go and read the sections in the User Guide next.
Bonus: Handle messages from Facebook
If you want to handle input from Facebook instead of the command line, you can
specify that as part of the run command, after creating a credentials file
containing the information to connect to facebook. Let’s put that
into credentials.yml:
facebook:
  verify: "rasa-bot"
  secret: "3e34709d01ea89032asdebfe5a74518"
  page-access-token: "EAAbHPa7H9rEBAAuFk4Q3gPKbDedQnx4djJJ1JmQ7CAqO4iJKrQcNT0wtD"
If you are new to Facebook Messenger bots, head over to Facebook Setup for an explanation of the different values.
After setting that up, we can now run the bot using:
python -m rasa_core.run -d models/dialogue -u models/nlu/current \
   --port 5002--credentials credentials.yml
and it will now handle messages users send to the Facebook page.
If you want to send buttons to the user like in the picture at the top of
this tutorial, update the utter_greet template in your domain to look like
this:
templates:
  utter_greet:
  - text: "Hey! How are you?"
    buttons:
    - title: "great"
      payload: "great"
    - title: "super sad"
      payload: "super sad"
Have questions or feedback?
We have a very active support community on Rasa Community Forum that is happy to help you with your questions. If you have any feedback for us or a specific suggestion for improving the docs, feel free to share it by creating an issue on Rasa Core GitHub repository.